Four Pages Your Website Needs Now + How To Add Them
// WordPress Quick Start Guide
Want to know the first four pages that you should publish when you set up your new website?
Today I am going to share with you the four pages your WordPress website needs now and how to add them.
Have you been following along in this blog post series to help you get your WordPress website set up?
If so, Congrats!
*que the confetti*
I'm excited to hear about your brand spankin' new website!
Don't be shy!
Share a link to your website in the comments below.
In case you missed the first three posts, you can read them here
1. The Difference Between A Website and Blog + 10 Reasons Why Your Business Needs BOTH
2. Quick Start Guide To Setting Up Your Website + Blog
3. How To Install A WordPress Theme And Instantly Add Style To Your Website
MUST HAVE WEBSITE PAGES
The first four pages that you should add to your website include the following:
- HOME PAGE - Think of this page as the virtual front door to your online business.
- ABOUT ME PAGE - Help your visitors better understand how you are the person that will solve their problem(s).
- CONTACT ME PAGE - Make it easy for your website visitors to get in touch with you here.
- BLOG / POST PAGES - Easily increase your authority and organic reach in search by frequently adding high-quality content to your blog.
1. HOME PAGE
This one may be obvious, but your home page will most likely be the most visited page on your website.
Think of it as the virtual door to your online business.
What do you want your visitors to do when they land on your home page?
- Use an attention-getting call-to-action
- Make it easy for your readers to know what to do next
- Add a navigation menu that makes it easy to find information
Here is an example of a home page that does all of the above:
Notice how they use an attention getting headline "Email marketing for professional bloggers" with a clear call to action "Get Started" button.
In addition, the navigation is simple and clear.
They even sneak in a testimonial from a current customer above the fold.
2. ABOUT PAGE
The about page is another must have website page.
Visitors look for the about page to gather more information about what you or your business does, often before deciding whether or not to do business.
- Sell yourself or your business here
- Tell why someone should choose you over your competition
- Be authentic and honest
PRO TIP: A new twist on the traditional About page is a "Start Here" page which directs new website visitors to click and learn more right away.
3. CONTACT PAGE
Once readers arrive on your contact page, they have made a decision to get a hold of you or visit your business.
Make it easy for them to call, text, email or locate you by including the most relevant information at the top of the page (above the fold).
- Make it easy to contact you by including some or all of the following: email address, phone number, physical or mailing address, contact form. Click to learn how to create WordPress Contact Form.
- It should be obvious how you want to be contacted and how you will follow up.
- Include a map if you have a physical location; WP Google Maps is an easy to use plug-in that makes it easy to find your business.
4 | BLOG PAGE
The blog page has become a must have website page due to its ability to provide fresh content, which search engines love. In addition, it keeps your readers engaged and coming back to your site. Some things to keep in mind when creating your blog page:
- Provide categories and / or a search bar so that readers can easily find information
- Organize your blog posts into categories that make sense for the content that you write about
- You have your reader's attention, be sure to include a call-to-action (for example, place a newsletter sign up at the bottom or in the middle of you blog post and / or in the sidebar)
I'm really loving Society 6's blog landing page:
Their blog page has clear categories and a search function.
When you scroll down they have amazing attention getting blog post images. (Their home page design rocks too.)
Here's HOW TO ADD A PAGE IN WORDPRESS
If you are new to WordPress, it can be kind of intimidating, but once you have learned how to tackle a few of the important tasks like how to add a page you will be feeling like a pro in no time.
It is important to note that WordPress offers two main content types: pages and posts.
Pages: A WordPress page is static and is not meant to be conversational (does not include comments section). Examples include your about page and contact page.
Posts: A WordPress post is meant to be conversational (includes comments section), organized by categories, and listed in chronological order.
Throughout this article I am referring to how to add a page in WordPress.
STEP ONE
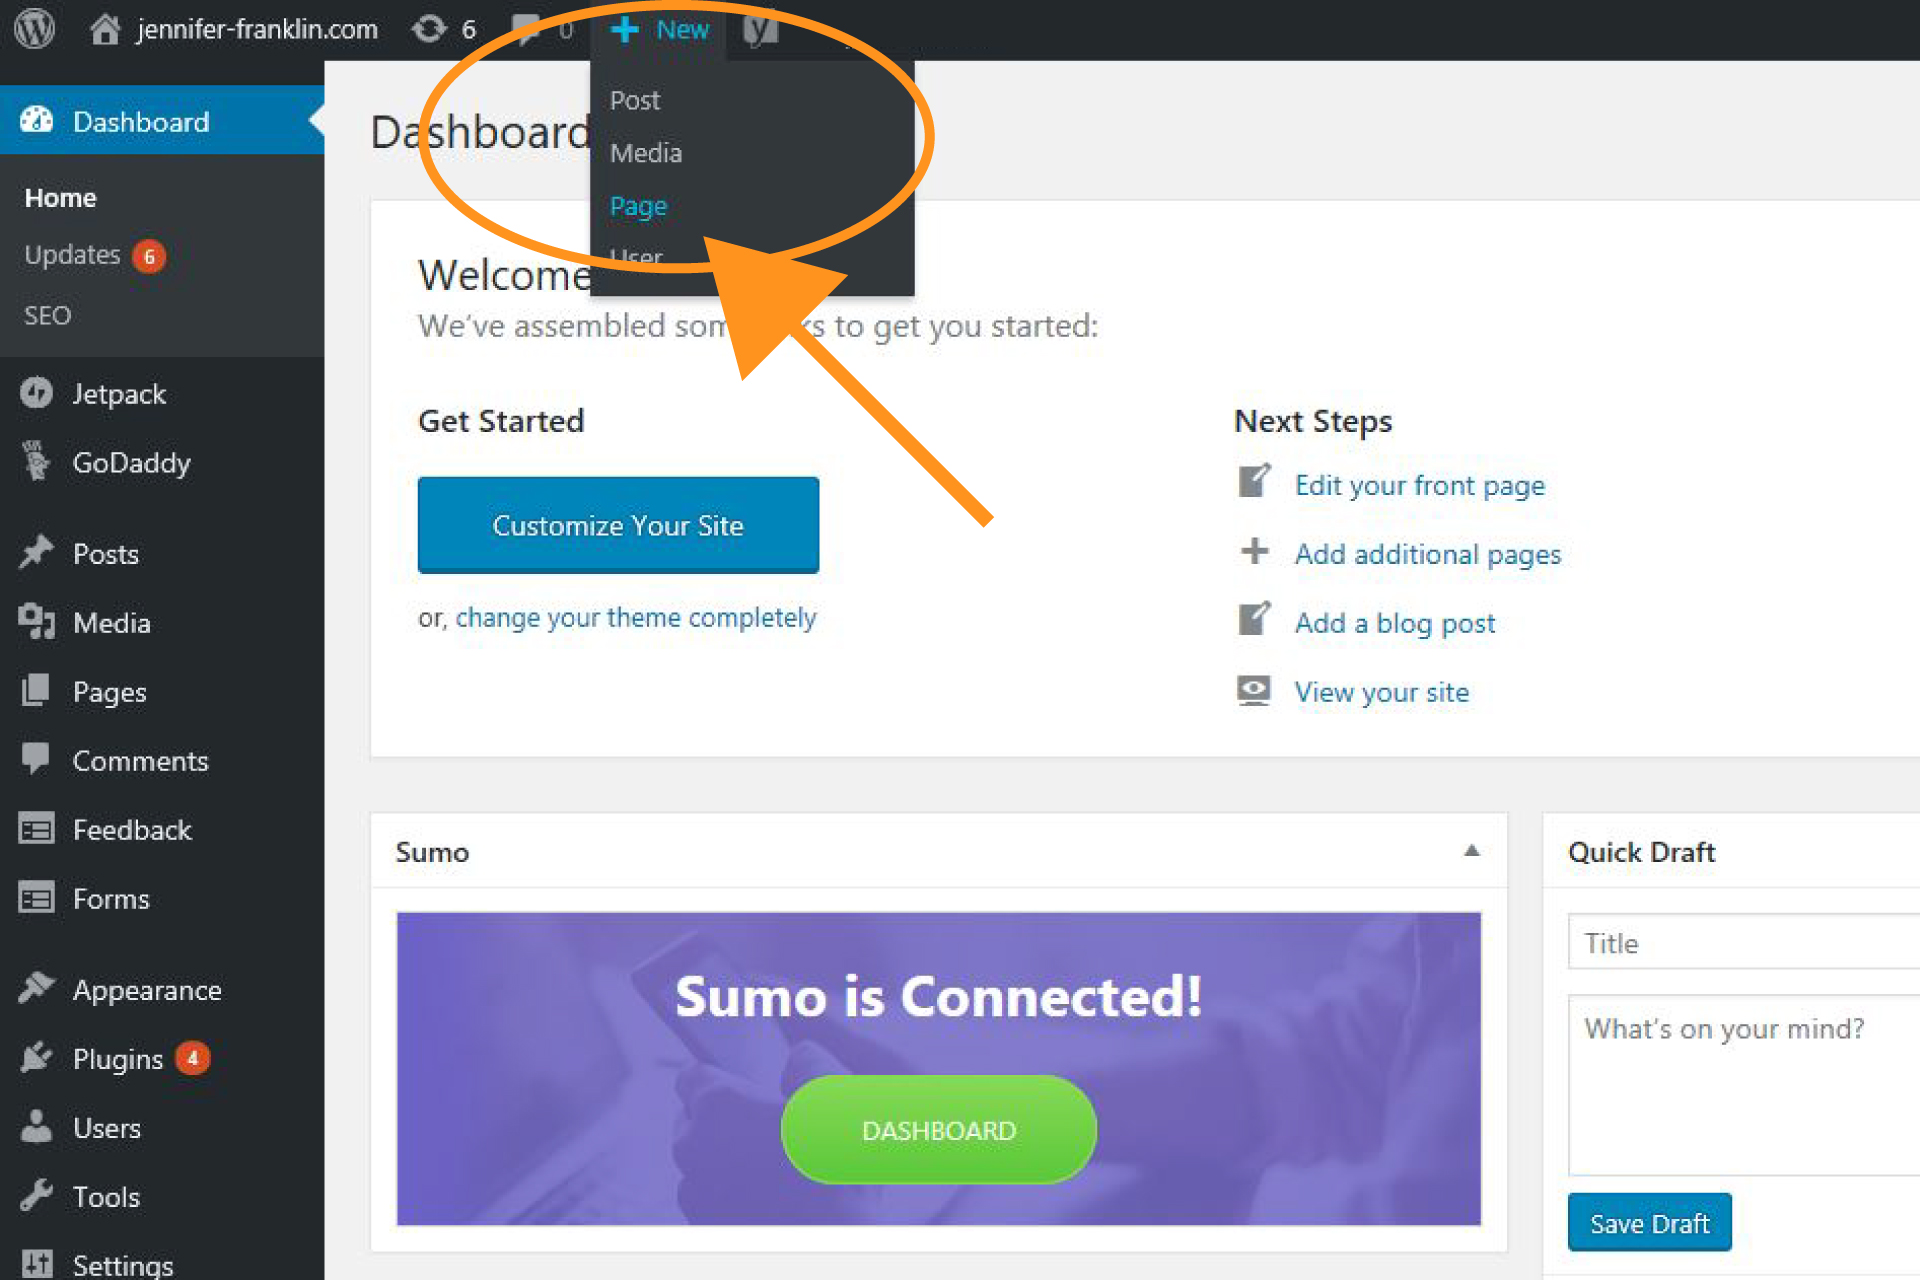
From your WordPress dashboard navigation bar, hover over +NEW.
The following choices will pop-up (note that depending upon your theme or plug-ins, you may see more options here): Post, Media, Page, Testimonial, Portfolio, Template, User, etc.
Click on PAGE.
STEP TWO
On this page you will create and publish your page by completing the following: add a title, edit permalink, add content, add featured image and hit publish.
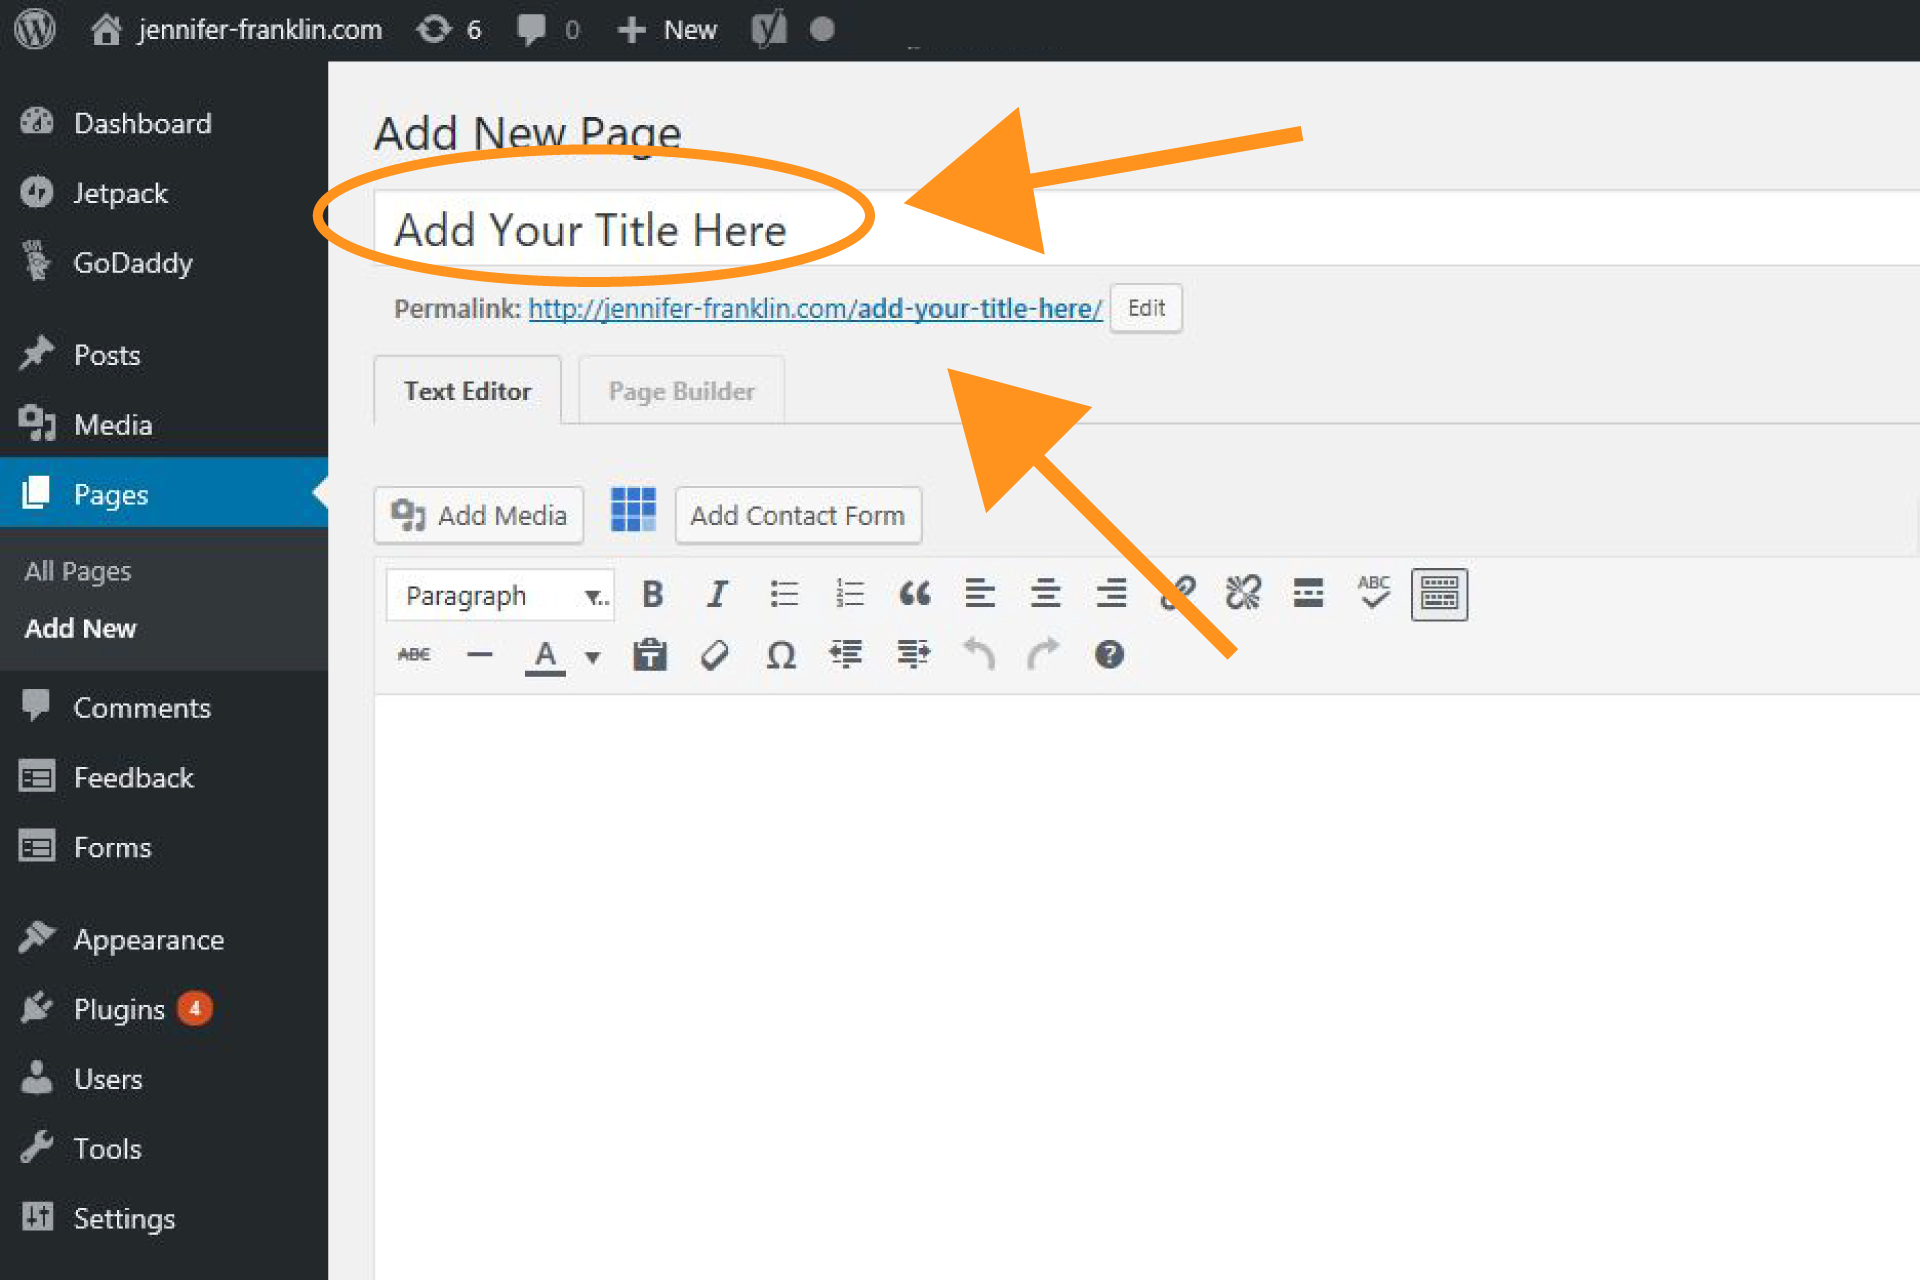
Add A Title: Here you will add your page title.
Edit Permalink: When you enter your page title, a permalink is automatically created for you. This is your page URL. In this example, I have permalinks set up to create a friendly URL like this:
https://jennifer-franklin.com/add-your-title-here/
More about permalinks and how to change them site wide in WordPress settings can be found in this article by YoastSEO here.
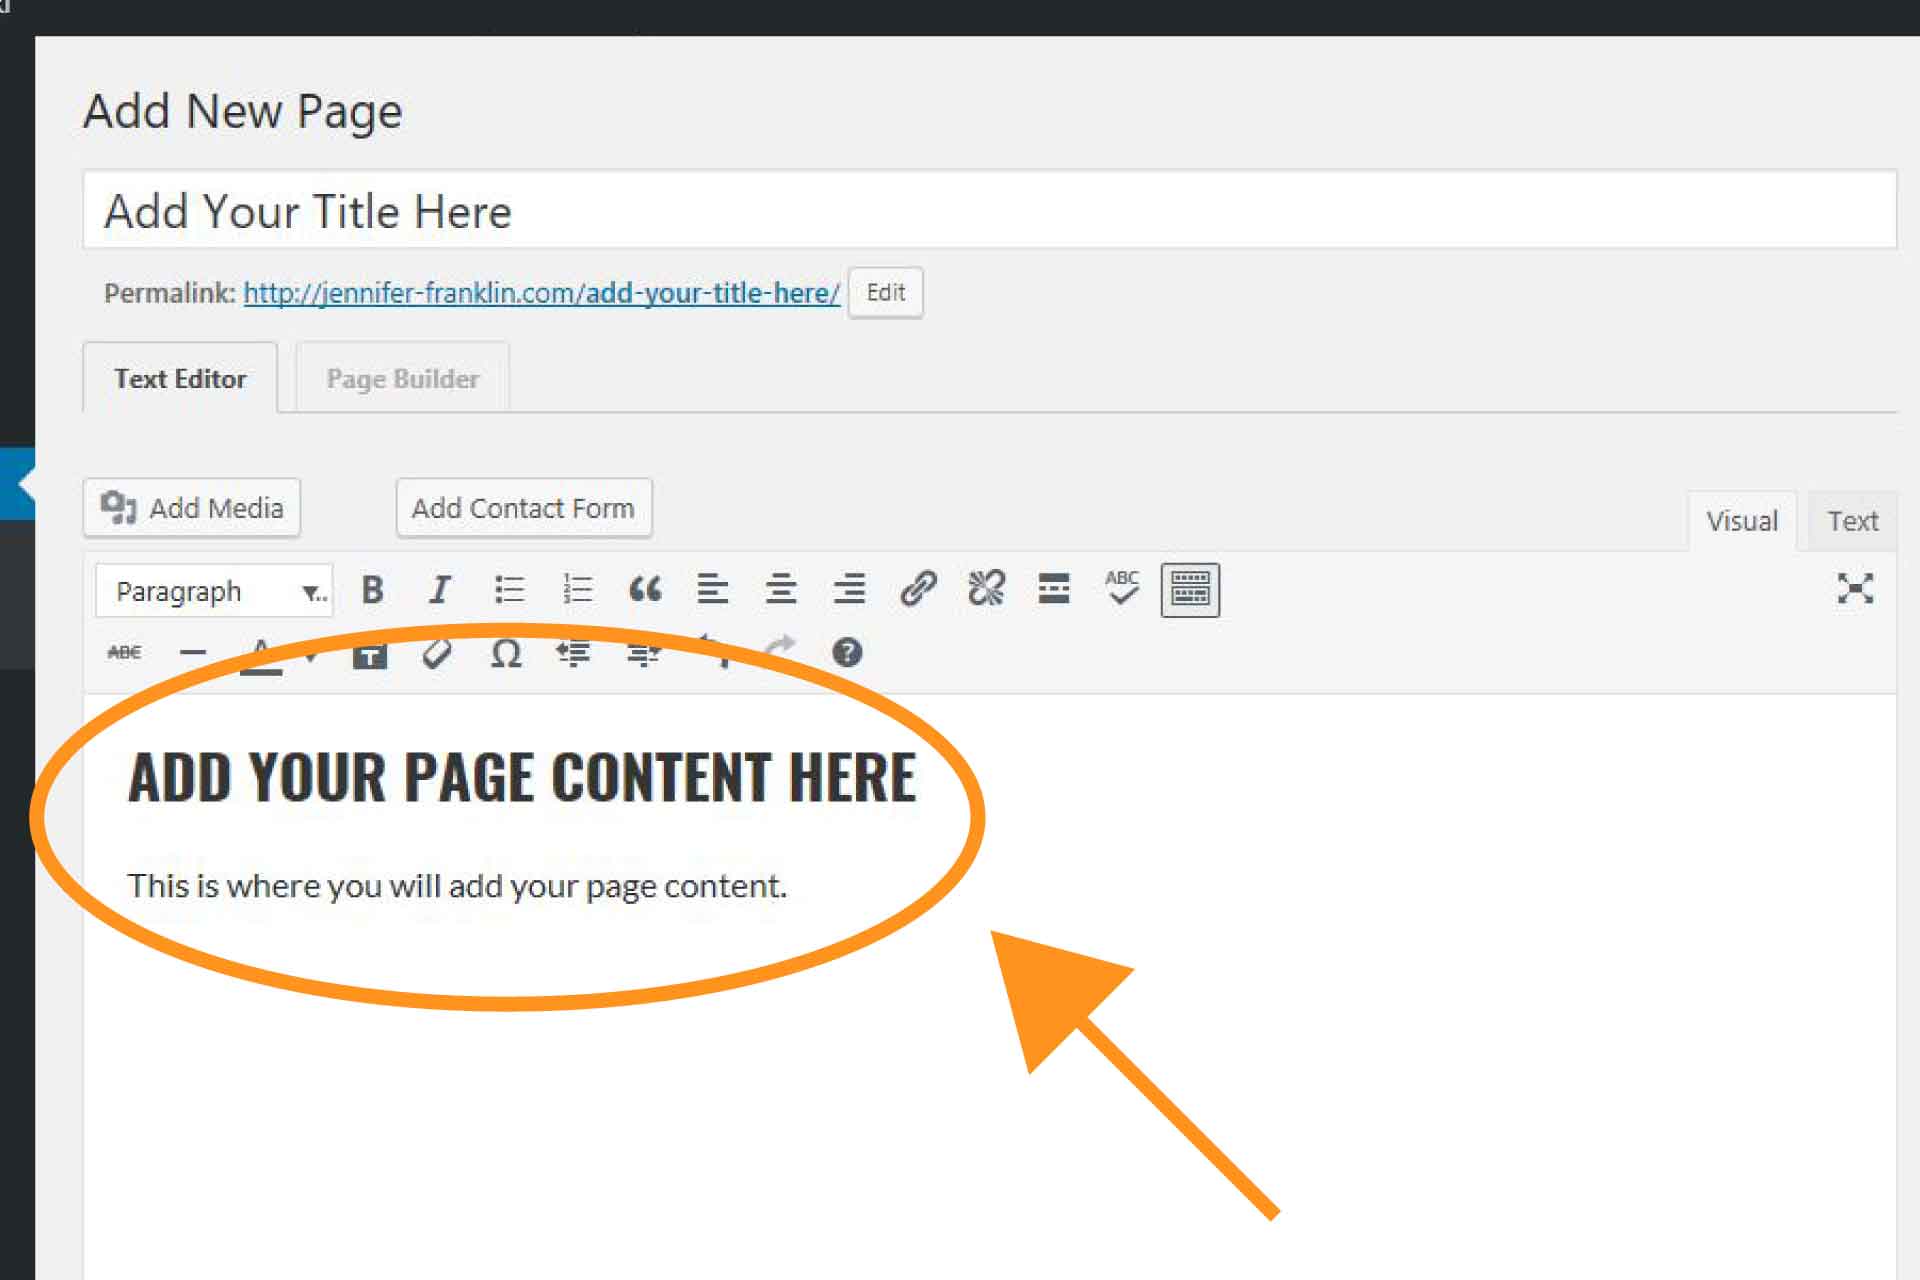
Add Content: Here you will add your page content.
I use and recommend a drag and drop page builder to make it easy to create amazing WordPress website page design.
Adding content is easy using the WYSIWYG (what you see is what you get) editor.
What you type in this box is what you will see when you publish the page.
Please note that the options in the toolbar may vary depending upon your theme and plug-ins.
Set Featured Image: In the bottom right corner, click SET FEATURED IMAGE to add an image to your page.
Depending upon your theme, this image will typically appear at the top of your page.
To add an image to the body of your page, you will click on the ADD MEDIA button in the add content toolbar.
From here, you can either choose from Media Library, Stock Photos, or Upload Image.
Choose Layout: Here you will choose the layout for your page.
In this example, I chose to have the content display on the left and a sidebar on the right hand side of the page.
Publish Page: The tools for saving and publishing your page can be found in the top right corner of your page.
Are you ready to hit publish? If you're not sure, click on SAVE DRAFT.
This will save your work. It is also a good idea to do this during the editing stage so that you don't lose your work.
To see what your page will look like when published, click on PREVIEW.
If everything looks good, click PUBLISH.
PRO TIP: If you would like to set up a password protected page for a RESOURCE LIBRARY page, for example, you can do this here too. Click on EDIT Visibility and choose PASSWORD PROTECTED. Type in a password and click OK. Now if someone lands on your page, she will have to type in the password to gain access. Visit my Resource Library page here to see it in action.
Want access? Sign up at the bottom of this page to gain access to my FREE library of resources.
Congratulations!
You have just created a page in WordPress!
Don't ya' feel like you can conquer the world now?
Before long you will be a WordPress Pro.
You got this ROCKSTAR! 🙂

RESOURCES MENTIONED
SAVE FOR LATER > PIN ME!




We’re a group of volunteers and starting a new site in our community. Your site provided us with valuable information to work on. You’ve done an impressive job and
our entire community will be thankful to you.
Thank you! Best of luck to you! 🙂
Great information! I recently found your blog on Bloglovin‘ and have saved it as a favorite to keep reading!
Thank you Jamie! The adventure is just getting started!