Wondering how to build a WordPress sales funnel? In this article you will learn how to create sales funnels using WordPress, WooCommerce and CartFlows quickly and easily without the need to pay for a separate service like ClickFunnels.
CartFlows is a WordPress sales funnel plugin that helps turn your WooCommerce store into a selling machine. It is an all-in-one solution with everything you need to generate leads and increase sales with pre-designed templates, one click upsells, order bumps and compelling checkout page offers.
This article will explain how to build a sales funnel in WordPress using CartFlows. Let’s get started!
How to Build a WordPress Sales Funnel
Before we begin, you will need to have your WordPress website setup and the WooCommerce plugin installed and activated. For more information on setting up WooCommerce, check out this article that walks you through the WooCommerce Setup Wizard.
In addition, I like to install the Beaver Builder page builder plugin to make creating and editing my sales funnel pages quick and easy. Or if you prefer to use Elementor’s page builder you can do that as well.
With your WordPress website setup, it’s time to begin building your sales funnel. In this example, we are going to set up a sales funnel to sell the following fake Digital Marketing eBook:

STEP 1: Add Your WooCommerce Product
The first step is to add the eBook as a virtual WooCommerce product. Navigate to PRODUCTS > ADD NEW. Give your new product a title. In this example, we name our product DIGITAL MARKETING EBOOK.
Scroll down to the PRODUCT DATA section:
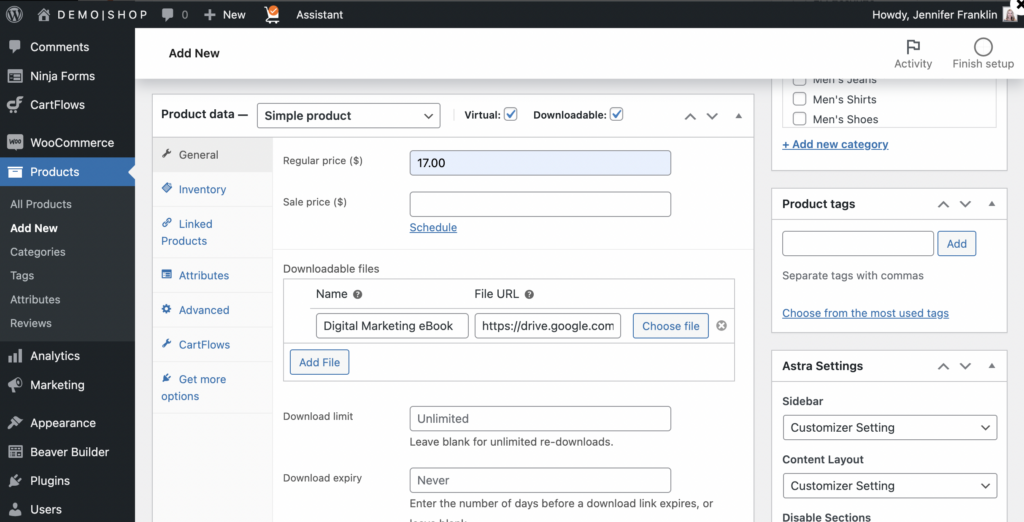
From the drop down, choose SIMPLE PRODUCT. This will allow you to sell your eBook as a downloadable PDF. To the right of this, check VIRTUAL and DOWNLOADABLE.
Next, enter a REGULAR PRICE for your product.
Most likely you will want your customers to be able to download the eBook right away. Click ADD FILE beneath the DOWNLOADABLE FILES section to upload your PDF file. Click CHOOSE FILE to upload and select the PDF file from the MEDIA LIBRARY. If you prefer to provide a link to your file stored in the cloud such as Google Drive or Dropbox, simply enter the File Name and File URL in the applicable fields.
There is also an option to add a DOWNLOAD LIMIT and EXPIRATION if you wish.
There is no need to include product descriptions when creating products for use with CartFlows. This is because the tool allows you to create custom sales funnel pages which you will learn how to edit in STEP 5.
If you want to include order bumps or one-click upsells in your funnel you will need to create a WooCommerce product for each additional offering. Don’t worry if you aren’t sure yet, you can always add these later on.
STEP 2: Install CartFlows Plugin
The next step is to install and activate the CartFlows WordPress sales funnel plugin. At this point, you may be wondering whether or not you need to upgrade to the PRO version.
You can definitely create a WordPress sales funnel website with the free version of CartFlows; however, the PRO version is well worth it and adds the following features:
- Checkout styles
- Order bumps, upsells, downsells
- Field Control
- Pro Templates
In this example, we will continue on with the free version and will note any options that require the PRO upgrade.
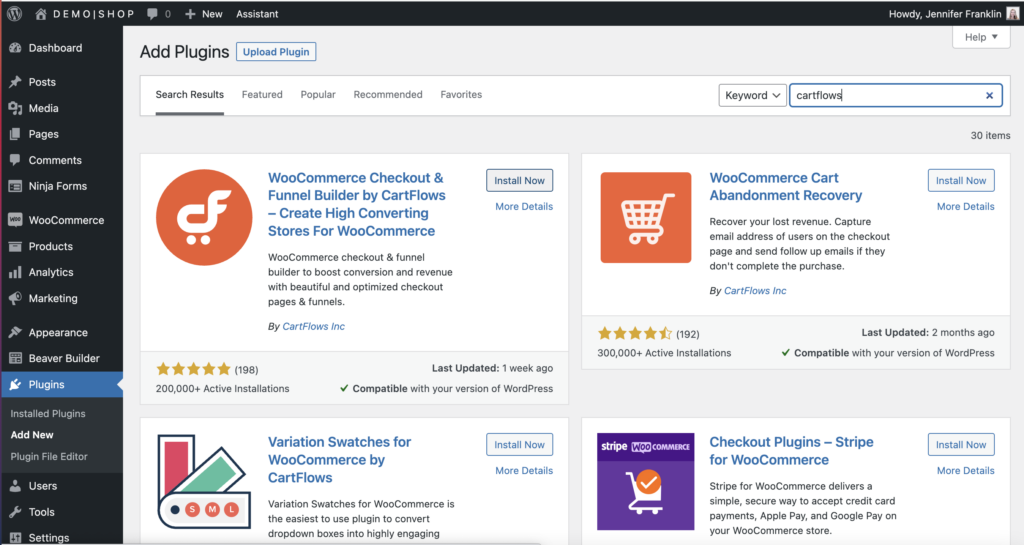
To install the CartFlows plugin, go to PLUGINS > ADD NEW from your WordPress dashboard. In the keyword search box, type CartFlows. Next, click INSTALL NOW and ACTIVATE to get started:
In the next window, click GO TO STARTUP WIZARD. I have found this to be the easiest way for beginners to get the CartFlows plugin setup.
If you happen to navigate away from the page, you will find a CARTFLOWS link has been added to the left WordPress dashboard navigation. Go to CARTFLOWS > HOME and click the WATCH THIS VIDEO link, scroll down and click the GO TO STARTUP WIZARD button to walk through the plugin setup.
This short setup wizard will help you get started with CartFlows:
Once you have finished the setup wizard, click FINISH STORE SETUP. Now you are ready to move on to the next step!
STEP 3: Choose a Sales Funnel Template
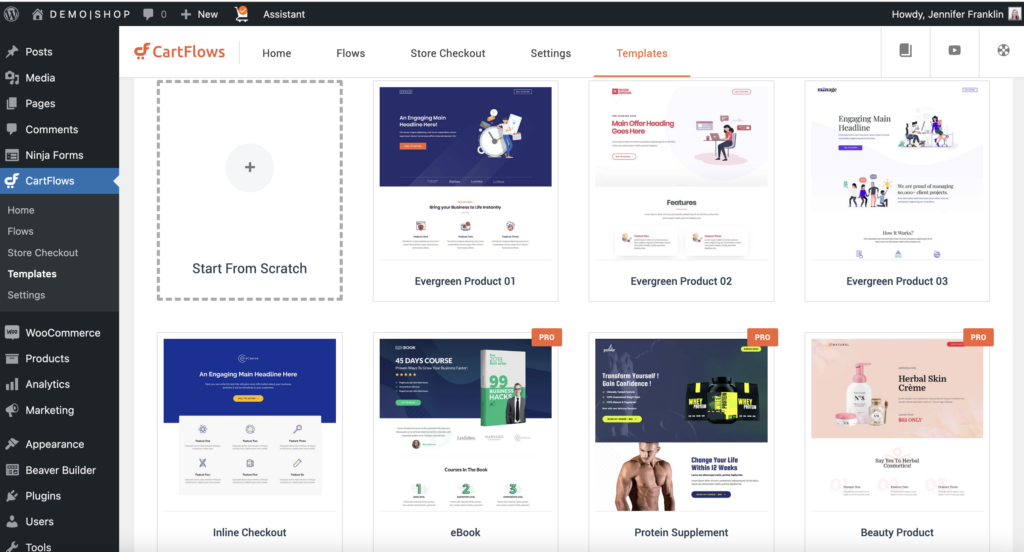
The next step is to choose a sales funnel template. If you weren’t redirected to the Flow Templates page, go to CARTFLOWS > TEMPLATES.
CartFlows comes with a variety of free and premium pre-designed sales funnel templates, which they refer to as a Flow. Alternatively, you may click START FROM SCRATCH to design your own:
Hover over a CartFlow Template and click VIEW ALL STEPS to see all of the steps in the funnel. In the next window, you have the option to click PREVIEW to see the full version of the template.
Once you have decided on a Flow Template, click IMPORT FLOW. In the popup, give your Flow a unique name. In this example, we named it DIGITAL MARKETING EBOOK.
You will be redirected to this page so that you can begin editing the steps in your sales funnel:
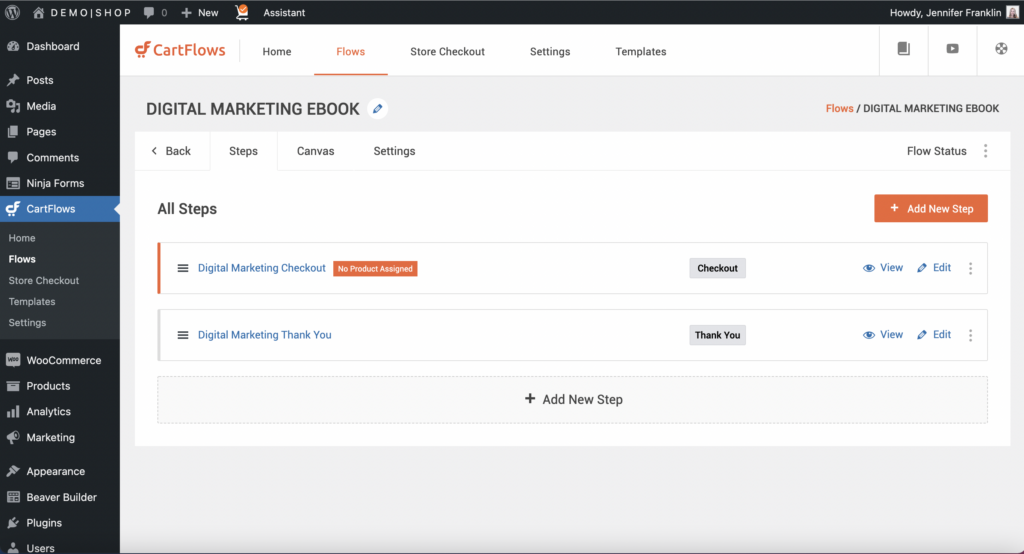
All steps in your sales funnel template are automatically created and imported for you and there is an option to +ADD NEW STEP should you want to expand upon your funnel. To the right of each step you will see the following options:
- VIEW – live preview the page
- EDIT – configure the settings
- CLONE (pro version) – make a copy
- DELETE – permanently remove a step
- A/B TEST (pro version) – determine which performs better
In the next step, you will learn how to edit your sales funnel.
STEP 4: Edit your Sales Funnel Settings
Now that you have your sales funnel template selected, it’s time to edit your Flow. Let’s begin by editing the first step in the funnel. In this example, the first step is the Checkout Page. Click EDIT to configure the settings.
In the next window, you will see a set of tabs:

These tabs will vary depending upon which type of page you are editing. In the above example, the Checkout page has the following tabs:
- Products – Add the product that you want to link to your checkout page. PRO users have the option to add a coupon and product options such as configure restrictions and set variations. Click ADD NEW PRODUCT to add the product that you created in step 1. If you haven’t created your product yet, click ADD NEW PRODUCT to be taken to the WOOCOMMERCE > ADD NEW PRODUCT page.
- Order Bumps – The PRO version of CartFlows allows you to add an order bump to your checkout page. Simply check the ENABLE ORDER BUMP checkbox. This article explains how to add order bumps to your WooCommerce sales funnels.
- Form Fields – The Form Fields tab allows you to enable the coupon field for customers to enter a coupon code; the enable additional field lets you collect more customer information; the enable ship to different address adds an alternate shipping address; the enable custom field editor allows you to hide or display fields in the form.
- Dynamic Offers – The PRO version lets you offer related products to increase sales.
RELATED: For more information I recommend reading this article: how to modify the checkout page using the backend settings.
Be sure to click SAVE SETTINGS before moving on from this step. In addition, I encourage you to play around with the different settings here to get to know the CartFlows user interface.
Back on the ALL STEPS page, click to EDIT the next steps in your Flow. In our simplified example, our next and last step is the THANK YOU page.
Once you have finished customizing the various settings for your individual sales funnel pages, you are ready to move on to the next step.
STEP 5: Edit your Sales Funnel pages using Beaver Builder
Now that we have our sales funnel pages set up, it’s time to edit the design using Beaver Builder.
Click EDIT; this time we will take a look at the DESIGN tab.
In this example we opted to create sales funnels with Beaver Builder during the CartFlows setup wizard and chose a pre-designed template for our design; therefore, we see the following notice here: You are using a Beaver Builder page builder, so all design options are available in the Beaver Builder Modules.
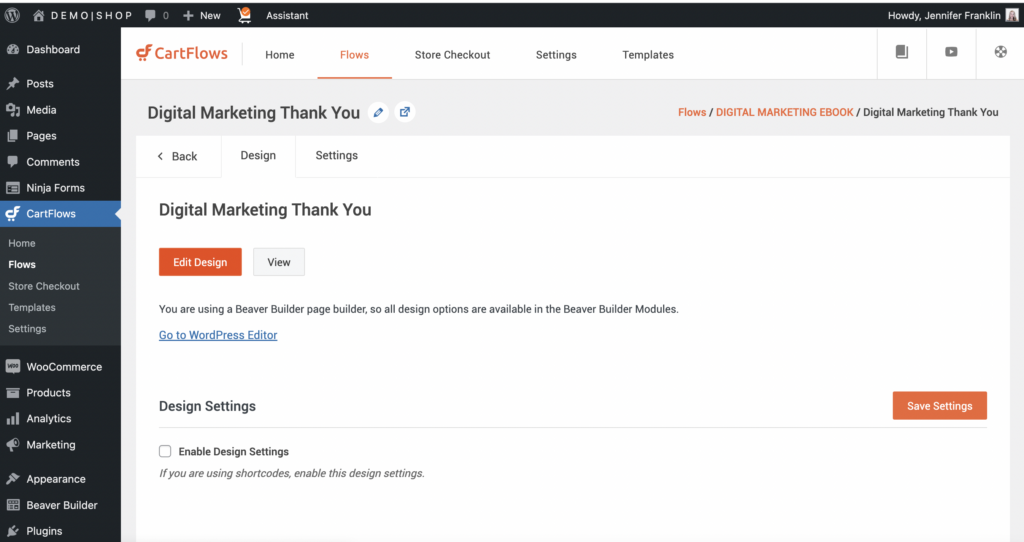
Click EDIT DESIGN to open up the Beaver Builder editor.
The most recent version of CartFlows includes the following Beaver Builder modules:
- Next Step Button/Link Module
- Optin Form Module
- Checkout Form Module
- Upsell & Downsell Shortcodes including Product variations and offer accept & reject modules
- Order Review Module
To access the available modules for each step in your sales funnel, click on the blue PLUS button in the upper right navigation of the Beaver Builder editor.
Next, click the MODULES tab. From the GROUP drop down, choose CARTFLOWS MODULES from the list:
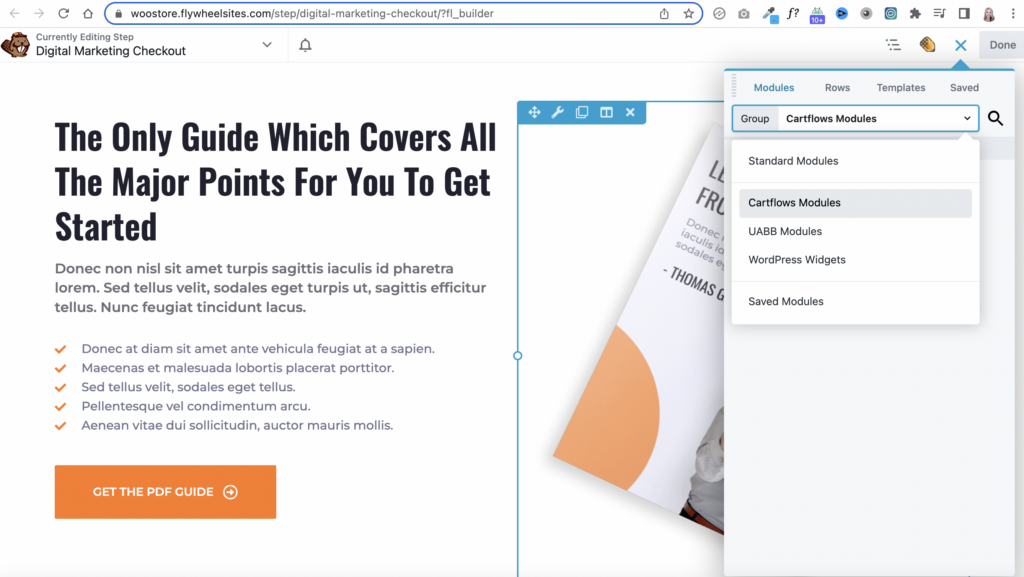
We are editing the Checkout page in the above example; thus, the Checkout Form Module is revealed in the list of available CartFlows Modules for this step in the Flow.
Since we began with a ready to use Funnel Template for WordPress, we can scroll down and see that the Checkout Form Module has already been added to our design.
Hover over the Checkout Form Module and click on it. In the pop-up, you will be able to customize the module’s style and settings by clicking the STYLE and ADVANCED tabs:
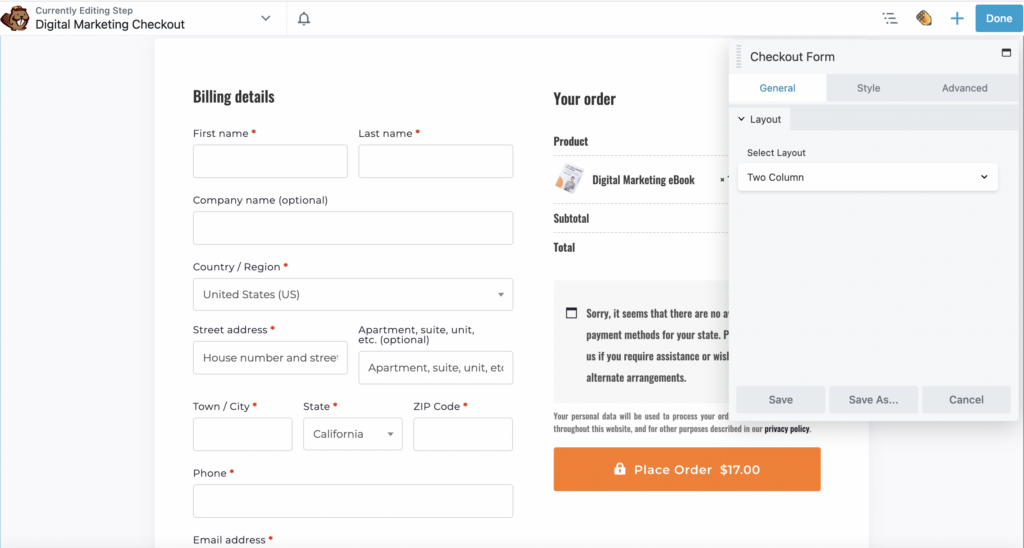
Click SAVE to save your changes made to the module.
STEP 5: Set up Your PAYMENT GATEWAY
Before you began building your WordPress sales funnel using CartFlows, you had to install WooCommerce so that you could add your product in STEP 1. Now, in order to process payments on your site you will need to setup your payment gateway if you haven’t already. If you already have your payment gateway setup then you can skip to the next step.
Any payment gateway for WooCommerce will work with the CartFlows checkout page. However, you may have noticed CartFlows installed the Checkout Plugins – Stripe for WooCommerce plugin during the Setup Wizard. This is because CartFlows is well integrated with Stripe, especially for use with the one-click upsell PRO feature.
Here is a list of popular payment gateways that I recommend if you plan to use CartFlow’s one-click upsell / downsell page:
- Checkout Plugins – Stripe for WooCommerce
- WooCommerce Stripe Payment Gateway
- WooCommerce Square Payment Gateway
In this example, let’s go ahead and set up the Checkout Plugins – Stripe for WooCommerce Plugin.
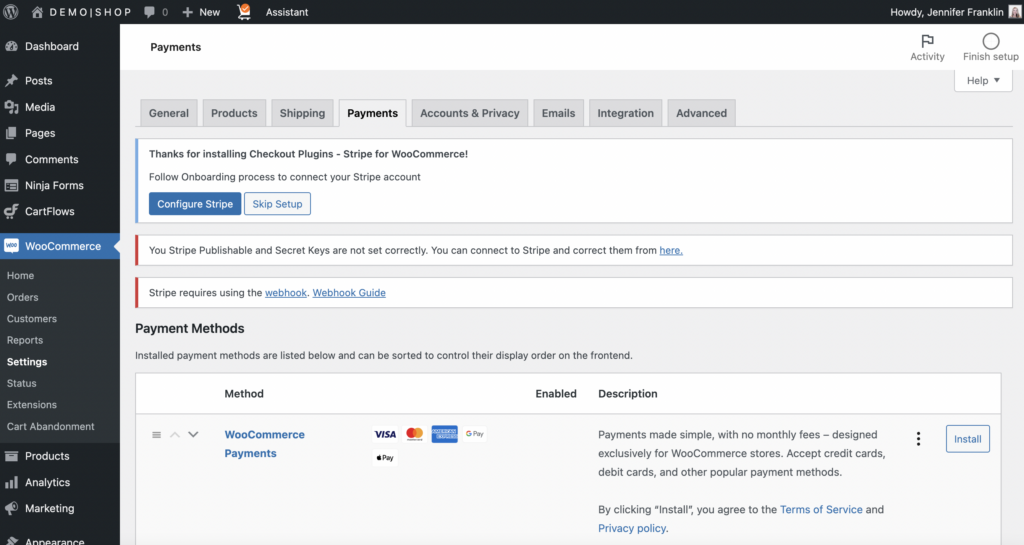
With the plugin already installed and activated during CartFlow’s Setup Wizard, go to WOOCOMMERCE > SETTINGS > PAYMENTS. At the top of the page, you will see the following notice: Thanks for installing Checkout Plugins – Stripe for WooCommerce! Follow the Onboarding process to connect your Stripe account.
Click CONFIGURE STRIPE to get started:
On the next page, click CONNECT WITH STRIPE to be redirected to Stripe. Follow the prompts on the page to connect your Stripe account to WooCommerce:
Check out this documentation for more information on setting up Stripe API settings.
If you are having trouble with Stripe or find it too difficult to set up, I have found both WooCommerce Square Payment Gateway and WooCommerce Payments to be great alternatives. They are easy to set up and alllow you to accept credit cards on your WordPress site.
STEP 6: Test your Sales Funnel
Now it’s time to see your sales funnel in action! Go to CARTFLOWS > FLOWS and click EDIT to the right of your sales funnel.
Next, click the SETTINGS tab and SANDBOX.
Check the box to ENABLE TEST MODE and click SAVE SETTINGS to save your changes:
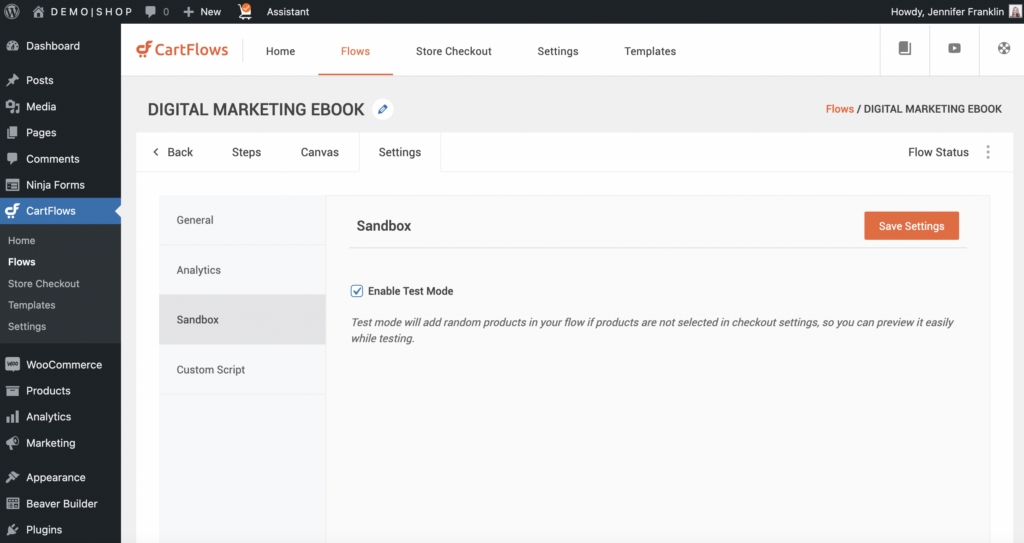
CartFlows added the Enable Test Mode option so that you can preview your sales funnel pages while also designing them in your page builder. Enabling this option also allows you to share the page’s direct URL to your team members for review or editing.
Note that while you are viewing CartFlows pages in Test Mode from the frontend of your site, you will see the following message displayed:

This lets you know that Test Mode is turned on. You are able to walk through your sales funnel and experience each step as if you are the customer so that you can address any potential obstacles before you go live.
For example, while reviewing my demo sales funnel in Test Mode, I noticed that there was not a convenient link to the My Account page from the Thank You page. I think this would be nice to have so that my customer’s will be able to see all of their orders and downloads from one location.
Once you have tested and improved your sales funnel, navigate back to the SANDBOX found under the Flow’s SETTINGS tab. Uncheck the ENABLE TEST MODE box.
Now it’s time to put your WordPress sales funnel website to work making sales for you.
STEP 7: Direct traffic to your sales funnel in WordPress
The final step to setting up your sales funnel in WordPress is to send traffic to your sales funnel in WordPress. The good news is that CartFlows makes it easy by automatically creating and linking the sales funnel pages together during the installation of your sales funnel template.
Remember that you are able to easily add extra steps to your Flow by clicking the +ADD NEW STEP button or rearrange the order from the Flow Editor page. In our example, we may want to add a Landing page and Upsell page to the first two steps, followed by the Checkout and Thank You pages.
Maybe you’re wondering how to get free traffic to your website fast? Here are 9 ways to begin sending traffic to your sales funnel landing page:
- Setup your Google Business Profile listing (and include a link to your sales funnel)
- Get featured on Podcasts, Blogs or YouTube video shows (don’t forget to mention the link to your sales funnel)
- Create 5 – 10 different pins (including video pins) and share your offer on Pinterest
- Update your email signature with your sales funnel link
- Add a button link with a call to action from your website’s top navigation
- Add a text link to your website’s footer navigation (come up with a clickable call to action)
- Create a Call to Action section on your Home page
- Send an email to your list letting them know about your new offer
- Create a variety of graphics and share your sales funnel link to social media
Developing and implementing a digital marketing strategy can be time-consuming and oftentimes frustrating, especially if you don’t know where to start. Contact me if you are looking for help getting your online business set up and growing. I am happy to help!
CONCLUSION
CartFlows is a simple solution for adding WordPress sales funnels to your website. By using the Setup Wizard and pre-designed templates you are able to get your funnel set up and in the correct order without wasting lots of time trying to figure it all out.
In this article, you learned how to build a WordPress sales funnel in seven simple steps:
- Add your WooCommerce product(s)
- Install the CartFlows plugin
- Choose a sales funnel template
- Edit your sales funnel pages using Beaver Builder (or Elementor if you prefer)
- Set up your payment gateway
- Test your sales funnel
- Direct traffic to your sales funnel in WordPress
RELATED QUESTIONS:
Are sales funnels better than websites?
Your sales funnels shouldn’t replace your website. In fact, when you build your website using WordPress you will be able to integrate your sales funnel into your existing site. CartFlows, a WordPress sales funnel plugin helps you create conversion optimized flows in just a few clicks.
What is the difference between a website and ClickFunnels?
The difference between a website and ClickFunnels is that a website built with WordPress can serve as both a website AND a funnel. ClickFunnels is a paid funnel building service that starts at $97 per month. WordPress allows you much more flexibility and often costs less to set up.


